After having rice so many times the week before (at this point in time I still had a little less than half a pot of rice left), I finally gave us a break and ventured out to completely new ingredients (almost): cut green beans, tomatoes, onions, beef.
So I got a ten dollar piece of sirloin (not the easiest to chew) and cut it in cubes of 1-2 inches on each side. When I finished, I put them all in a pot on the stove with a little bit of oil and let them cook evenly on all four sides, occasionally stirring. Once that was done, I poured water on top until they were almost completely covered and let them cook through thouroughly, just in case. When most of the water boiled off, I decided they were done and took the beef cubes off the stove.
While I was waiting for the beef to cook, I opened two cans of cut green beans (low sodium, because everything in a can usually gives you like 30% of your daily intake it seems like) and started cooking them in their own pot.
In a third pan, I started sauteeing some onions. Once the onions were sauteed and had lost their white color, I poured the contents of a can of diced tomatoes on top. At this point in time the green beans were almost ready, so I poured the tomato/onion sauce on top of the green beans and stirred that pot.
My boyfriend loved this dish as well as my friend Paige -- who even asked for the recipe! I did not add any condiments of any sort (especially no salt) because once I add anything from a can to my dishes, I feel like they've already been processed and salted enough and I don't need to add anything else myself. I think next time I make this dish, I'll try using tomato paste instead of - or along with - the diced tomatoes to make the sauce a bit creamier.
I did not end up getting a picture of this one :(.
I highly encourage everyone to start cooking at home if you don't already do so. Most of the dishes I put on here take about 20-40 minutes to cook. I live really close to where I work, so if the recipe is REALLY simple, I can sometimes cook everything fresh at lunch. Other times, I just prepare part of the dish that morning or the night before and do the fast part when I get home at lunch. I think it's a great alternative to going out to lunch not only because it's healthier and helps save money, but it also will allow you to practice cooking and make little mistakes you can live with and you won't have to make these mistakes at a dinner party. :) In the end, you become a Chef Extraordinaire!
Tuesday, October 12, 2010
Wednesday, October 6, 2010
Romanian Traditions - Coliva
This past Saturday, my boyfriend's paternal grandfather passed away. I had never met him, but I remembered how I felt when my grandfather passed away. I wanted to do something in my boyfriend's grandfathers' memory to make this time of grief easier for both him and his family. So after thinking a little bit about it, I ended up thinking of food as a method of comforting -- something it seems I think can solve all problems.
In Romania we have a dish that's traditionally served when a family member passes away. Usually the widow or the immediate family members of the person passing away prepare this dish, but I thought it would be okay this time if I prepared the dish and gave it to my boyfriend's family. The tradition varies around the country, and since I'm from the capital city of Romania I wasn't familiar with how everything is carried out in the countryside - where all traditions are more deeprooted - but I knew what I had seen happen growing up. And I've learned more about the traditions in the countryside in these past few days as I was looking up various recipes for this dish. Turns out, in some parts of the country this dish is made by the deceased person's family and brought to the church on the day of the funeral. After it is blessed, it is then shared with everyone who attends the funeral. Now that I think about it, I think that is what happened at my grandfather's funeral but I was only six or seven years old when that happened so it's all a little blurry in my head. In larger cities, like in the capital, sometimes it is hard to gather everyone that wants to commemorate the deceased at once and so sometimes this dish is put in ornate tea cups and coffee mugs, which all match among each other but don't match the recipient's tea sets at home. These tea cups and coffee mugs are exactly that and are not designed specifically for this purpose. Once you receive a cup or a mug with this dish, you do not return the cup usually. My grandmother's cupboard is full of cups that don't match and she claims it's because she's received so many cups along the years from this tradition, but it's also because a lot of cups have been dropped and broken over the years, leaving most of her collections of cups and mugs down to one or two of the original sets of six.
I have never had to cook this dish myself (although it's traditionally associated with a death in the family, sometimes it is cooked just because it tastes good), so this was an adventure. In Romania it's easy to find the ingredients; in the United States it isn't easy to find the ingredients. Since the dish originated in the countryside, where wheat kernels were readily available, procuring the ingredients wasn't a problem. Since wheat kernels aren't actually a staple in people's diets in the United States, procuring the ingredients here was harder. Luckily, in the larger grocery store in the international foods section, I found some wheat kernels. I forgot to get the recipe with me and only bought one bag, which means my whole recipe had to be cut in half once I got home.
I boiled the kernels after washing and rinsing them thoroughly for about 40 minutes. The recipe said to cook them on low for 2-3 hours. Turns out not only is 6 not low enough of a setting for my stovetop, but also the kernels really cooked and partially burned on the bottom within the first 40 minutes. So I went through all the kernels (it felt like I was going one by one) until I picked out all the burnt kernels and started over in another pot. Once that was done and I let the kernels cool off, I added 3 oz of honey, 4 oz of sugar and 100 g of chopped walnuts. I stirred everything together and as would be expected, I forgot to add the vanilla, which I had to add later on after I set the food in it's serving dish.
It is traditional to decorate the dish with candies and chocolate and cocoa powder, so I did. I first sprinkled powdered sugar on top. I used a cutout of a cross to keep the center area white in the shape of a cross and sprinkled cocoa powder on top. When I removed the paper cross cutout, I had the cross imprint left in white and cocoa powder all around it. I then placed chocolate covered cranberries in the white section in the shape of a cross. Here is an image of the resulting concoction:

May he rest in peace.
Tuesday, October 5, 2010
In the search for the perfect mashed potatoes...
I don't know when my love affair with potatoes really started, but like all great loves I know they're not healthy for me, but I can't walk away from them.
I guess it's the fact that all my happiest dinner/lunch table childhood memories involved potatoes -- specifically mashed potatoes. My two most favorite meals were mashed potatoes with schnitzel (which I have yet to make on my own) and mashed potatoes with chifteluţe (another dish I have yet to make on my own). The creamy softness yet hearty taste of mashed potatoes always put a smile on my face and I have since been in search of the tastiest mashed potato recipe to call my own.
Last night, while I was debating the different options I had for acquiring some milk to make mashed potatoes (either I could go to the store in the morning before work, or I could ask my boyfriend to bring me some from his apartment, or perhaps he'd volunteer to go to the grocery store for me), I realized how amazing mashed potatoes could be with a little bit of cream cheese.
A friend of mine in college cooked me dinner one night and he used sour cream in his recipe and it was delicious! (He got the recipe from his mother so she deserves the credit for that compliment more than he does.) But I didn't see what else he put in the mashed potatoes nor how much, so I haven't tried to recreate that recipe.
Another version of mashed potatoes I made once, that were surprisingly delicious, were these mashed potatoes I made only with butter and milk. But then, I heated up some peas and sauteed some onions and threw those inside the mashed potatoes too and it may have been one of the best decisions made for that meal. I brought it to the potluck Thanksgiving meal I had been invited to and everyone loved them!
I really want to find that perfect addition to the regular mashed potato recipe I use (potatoes, milk, butter) so until I find it, I will not be satisfied.
So today for lunch, my boyfriend and I undertook the challenge of using whipped cream cheese with chives in the mashed potatoes. Really, this was supposed to be my adventure and he was going to be my guinea pig, but he didn't want to do the dishes, so I ended up doing the dishes and he mashed the potatoes. But skipping over the technicalities...
We used about two pounds of potatoes -- peeled and boiled/cooked, one 8 oz. package of whipped cream cheese with chives and half a cup of milk. The overall outcome was good (I still wouldn't give it a ten), and I think it could have been better with a little more potatoes and maybe even some real chives or mildly sauteed onions mixed in there.
I served the potatoes with some fried frankfurters (bought at the international foods store, although I'm positive using some kosher hot dog sausages would have worked just as well). And here is a picture of what our lunch ended up looking like. Not sure my boyfriend was the biggest fan of this meal so I'm not sure he'll want to eat it for dinner again in two days, but I know I will!

Wednesday, September 29, 2010
Rice Cooker Fun!
For my birthday this year, my parents gave me a rice cooker, a crock pot and a little George Foreman grill. Thank you, parents! I think it's because I never ask for anything in particular for my birthday (which I guess makes it a little impossible to find a good gift for me considering how picky I am sometimes), so buying me cooking supplies/kitchen appliances is a pretty safe bet.
But I'm also scared of the unfamiliar and since I'd never used a rice cooker before, the idea of using the rice cooker intimidated me for a while. Finally, one night, when my boyfriend insisted we watch the movie Hidalgo -- a quasi-Western set in the Middle East -- which was close to 2 hours in length, I decided it was the perfect time to experiment with the rice cooker. My mother had also given me some brown rice and my rice cooker adventure began.... Turns out brown rice takes about two hours to be done. And since I hadn't accounted for two hours (I assumed the rice cooker would be more efficient than me cooking rice normally), I ended up eating scrambled eggs with Feta as a snack instead. I may be wrong, but I think that's probably a very healthy, tasty snack.
Anyhow, my next adventure with rice was Basmati rice. There's this amazing Persian restaurant close to where I live and their rice is divine. And since I want to also make delicious rice like them, I decided to use my rice cooker to make some Basmati rice. Well you can't just eat Basmati rice plan -- I guess you could, but that's not a meal then -- so I also made some tomato sauce and served those two with chicken. It was delicious and healthy, but I need to learn some portion control. I made that rice on Sunday and I still have half a pot of it left and my boyfriend and I have eaten about 5 or 6 servings of that meal until now.
So here's how I did it, although you may want to cut down on the ingredients and not make enough for a small army.
I put two cups of rice in my rice cooker. Also, it turns out that you're not supposed to measure cups of uncooked rice in regular cups but in standardized rice cups (?) which are 180 mL, not the regualar 240 mL.
It only took about ten minutes to cook (as opposed to the brown rice which took a century!)
In the meantime, I got a can of diced tomatoes, put it in a pan and started heating it. In a separate pan, I began sauteeing some bell peppers and onions. As soon as they started heating up and looking like they were ready, I moved them over to the first pan with the diced tomatoes and mixed everything together.
Then I used a pot and cooked some pieces of chicken through. I originally just cooked/boiled them in water for a healthier alternative but then added some oil to make it tastier.
And here is how a plate of this concoction ended up looking. Deliciously healthy and satisfying.

Thursday, September 23, 2010
First Month Anniversary Dinner!
My boyfriend and I are celebrating our five month anniversary in about two weeks. Obviously, the title gives away how slow I've been at updating. I don't have any good excuses except "life happened."
But here's the story anyway...
So when it was almost our first month anniversary, I thought I'd treat my boyfriend to his first taste of my culinary adventures. I could have gone with something safer/simpler or maybe even something I had cooked before, but I don't like repeating recipes in the kitchen unless there's a good reason (like training a puppy or being enrolled in one too many self-improvement classes). And since I wasn't short on time or creativity at the time of our anniversary, my boyfriend got a pretty good meal: chicken breast with sauteed onion/vinegar/cranberry sauce -- its formal, chef-friendly name escapes me now -- and hasselback potatoes.
I figured the chicken breast part of the recipe wasn't too crazy, so I won't provide an in-depth explanation of how I made that part. Really, I just got the chicken breasts at the grocery store, put them on the stove in a pan (not having either an outside or inside grill, a pan was this girl's best friend at that point in time) and let them cook through thoroughly.
While the chicken breast was cooking, I melted some butter in a second pan, cut some onions in pretty small cubes and sauteed them. I then put some vinegar and cranberry sauce in there for extra taste. Since it's been so long since I actually made the recipe, I forget how much of each I put in.
Now, for the funnest (and most time-consuming part) of that dinner: the hasselback potatoes. There's a little bit more prep time than I usually like for any of my recipes, but I knew the outcome had to be delicious.
First, I got about eight small/medium sized red potatoes, cleaned them off and started cutting them. I cut them about halfway to two thirds through all the way across in increments of about a quarter or a fifth of an inch at a time. You can look in the picture below to see what I mean.
 |
| Cut potatoes about 2/3 of the way through at increments of 1/4 or 1/5 inch. |
Then I cut some garlic clovers thinly and put them between each section of potato. Don't worry if you're not a huge garlic fan, because the taste won't be overwhelming once the potatoes are cooked through. After you've put all the garlic in, put some melted butter on the bottom of a baking pan, and some salt sprinkled all over and rub the potatoes around until they're all covered in the butter/salt.
 |
| Put the sliced garlic cloves between the sliced potato wedges. |
Put the potatoes in the oven for about 40 minutes. I forget what I put the oven on, but really it's like you're making baked potatoes. You can take them out when the tops are all golden brown.
Now, the next part will be the dollops of sour cream you put on top. Delicioius!!! You get about 8 oz of sour cream, you're supposed to put real garlic and parsley for better taste, but I didn't have any in my apartment, so I just used garlic powder/salt that had parsley sprinkled in there, too. Put the garlic/parsley in there to taste. Mix it well and put it in dollops on top of the potatoes once they're out of the oven and ready to serve.
Here is a picture of our final meal all put together. Good luck to everyone who tries this recipe!
Here is a picture of our final meal all put together. Good luck to everyone who tries this recipe!
 |
| Final dinner. Yum! |
Saturday, April 10, 2010
Ice Cream... with Croutons!
So in preparation for becoming a party host extraordinaire, I have decided to start practicing making fun appetizers! And for my first experiment, I decided to use what I already have in my fridge...
As you may remember from my last post, my mother overstocked my fridge three weeks ago, and I am still feeling the side effects of it. Just a couple of days ago, as I was scavenging for sweets in my kitchen and started looking for ice cream, I saw this package of cinnamon raisin bagels that she bought for me. The only problem with that is that I don't particularly like cinnamon, and I'm honestly not that big of a fan of raisins, either. So while trying to figure out how to use these bagels and not throw them out, I had a brilliant idea: why not use these bagels in a dessert?
Turns out, when you Google what flavors match best with cinnamon and raisins, apples turn out to be the most popular choice. Lucky for me, I knew exactly where to find those and I was ready to try it out. In fact, this recipe is so simple, I will even type it out for you guys on here so you can make it too! It's really simple, and if you're low on ideas and/or time for making dessert for a dinner party, I highly recommend making this. All you need is some vanilla ice cream, some cinnamon raisin bagels, apple cider, apples, and a little bit of olive oil. So let's get started!
As long as your bagels aren't moldy, you can use them. So even if they're a little stale, you should be fine. But if you are grocery shopping quite a few days before your party, just put them in the fridge or freezer to keep it for longer. First, go around your bagels and chop them up into 10-12 pieces total. I didn't get a picture of this when I was doing it, but the best way to explain how to cut it, I would say cut it like you would a pizza.
Then, spread a little olive oil on your cooking pan and put the bagels on there. (When I say a little bit of oil, I mean 1.5-2 tablespoons of olive oil.) I moved them around on the pan, just to make sure the bagels were covered pretty evenly with the oil.
Third, I peeled a couple of apples and cubed the edible parts of the apples. And when I was done, I threw those on the pan, too.
To make sure the apple taste was infused in the bagels and that they wouldn't become really crouton-y, like you would have in your salads, I poured apple cider on top of the bagels. I had never done this before and wasn't sure how to pour the apple cider out of the huge bottle it came in; also, I have no measuring cups yet, so I had to use the closest thing I had to a small measuring device... I used a shot glass. This may have been the reason why the bagels ended up tasting a little bit like bread pudding pieces, and it was amazingly yummy.
In total, I ended up using two bagels, three apples, and four shots of apple cider. I left them in the oven at 350 degrees for about 20 minutes and that's it for the preparation part.
Let them cool a little bit and then serve them just as a topping on top of some vanilla ice cream. When I served them, it had been a while since I'd taken them out of the oven, so I just put them back in a microwave for 25 seconds and they were ready to be served!
Here is a picture of the serving I made myself. This dessert will most definitely be making an appearance at one of my parties, so be on the look-out kids!

Friday, April 2, 2010
Too Much Food In the Fridge... Again.
Since my parents came to visit me two weekends ago, my fridge was overstocked with veggies, carbs and meats. This actually always seems to happen when my mom finds a fridge that is not adequately overflowing with food. Although it was all done out of love, I think they grossly overestimated how much I could eat by myself. I would not have minded if this was limited to cans and pasta -- food that could last for more than two weeks without me living in fear of it going bad. One of my saddest and hardest errands and household duties is cleaning out my fridge and throwing away food that I used to have such high hopes for. When I go to the grocery store, all the limitless supplies of perfectly aligned apples and avocados, croissants and butter sticks, eggs and milk cartons just inspire me. That and I'm a sucker for pretty designs, so put a pretty wrap around that vegetable smoothie bottle, and you've got yourself an inspired customer! But then, I work late hours and by the time I come home, I hardly have the time or energy to prepare the extravagant meals I concocted mentally while rummaging around the frozen vegetables section. And then, a few weeks later, when I see the mushrooms shriveling up in my fridge and my avocados becoming unhealthily soft, I avoid throwing them out as long as possible. Not because I have any intention of eating them, nor am I delusional into thinking they'll get better, but because I hate throwing food away.
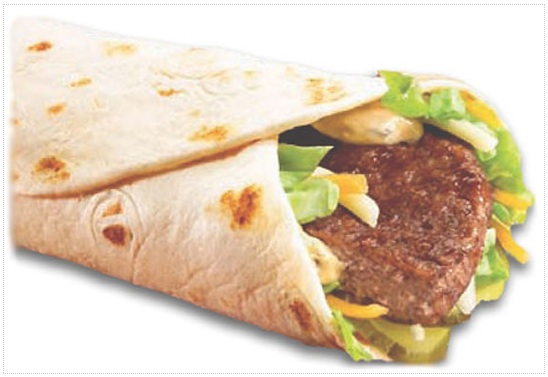
It is this exact train of thought that brought me to the idea of having a private dinner party for four tonight. My abundance of veggies, pita pockets and chicken (all of which had been in my fridge for a little longer than I had originally intended for them to be there) needed to be eaten. And since I could not eat that much alone, I figured I'd spread the joy and feed my friends! My only experience in making pitas had come from watching the cute boy at Pita Pit who worked at the store I went to on Tuesday nights in my last semester of school. But not having any prior experience in cooking, preparing or making pitas did not discourage me from deciding tonight's menu would be based around pitas. Turns out, I have quite the beginner's luck. Here is the picture of one of tonight's concoctions. I think the best part of having pitas for dinner is the fact that I could make sure each of my guests was fully satisfied, since everyone got to personalize what went in their pita. I think I'm going to make a regular event of these fridge-cleaning dinner parties, considering the success I had tonight. Want an invite? Let me know and we'll see what we can make happen!

It is this exact train of thought that brought me to the idea of having a private dinner party for four tonight. My abundance of veggies, pita pockets and chicken (all of which had been in my fridge for a little longer than I had originally intended for them to be there) needed to be eaten. And since I could not eat that much alone, I figured I'd spread the joy and feed my friends! My only experience in making pitas had come from watching the cute boy at Pita Pit who worked at the store I went to on Tuesday nights in my last semester of school. But not having any prior experience in cooking, preparing or making pitas did not discourage me from deciding tonight's menu would be based around pitas. Turns out, I have quite the beginner's luck. Here is the picture of one of tonight's concoctions. I think the best part of having pitas for dinner is the fact that I could make sure each of my guests was fully satisfied, since everyone got to personalize what went in their pita. I think I'm going to make a regular event of these fridge-cleaning dinner parties, considering the success I had tonight. Want an invite? Let me know and we'll see what we can make happen!

Almond Joy Cupcakes? Heck yes!
During my last internship, I discovered that the best way to convince people to not mind coming to your cubicle and helping you out is to be able to offer them something. Although my charm, personality and humor usually served well enough during my college career in gaining people's willingness to help me, people in the real world needed something more tangible than my friendship. That is when I realized the importance of always having a bag of bite-sized Almond Joys in your cubicle. People will unknowingly stop by to ask for a piece of chocolate, which is when I would rope them into helping me on whatever I was working on. And if I didn't have any questions, they usually would offer me their contact information -- which I never failed to take note of and actually contacted them later for help.
Well, during that summer I realized how amazing Almond Joys really are. I love coconut. I love chocolate. And I definitely love almonds. Whoever came up with the idea of mixing the three was really onto something. But why keep this amazing flavor combination only in a chocolate candy bar form when you can adjust it to become a cupcake? And that is how the adventure started...
My first almond joy cupcakes made an appearance at the end of last summer. They were quite interesting to make. The actual cupcake part was made with brown sugar, which I failed to realize would definitely affect the sweetness of the cupcake. To make the cupcake, I had to cut out a bit of the middle to fill it up with the coconut-sugar-cream cheese filling, and when I tasted the cupcake part I had cut out, I was really disappointed. My first thought was "did I forget the sugar??" That is the only way to describe the taste. I was horrified, especially considering I had spent so much time on the recipe. But I did not give up. Turns out, the coconut-sugar-cream cheese filling more than made up on the sweetness of the cupcake once you bit into it.
Since I will always hold a special place for Almond Joys in my heart (and stomach), I decided to let them make another appearance. So here's one of them!

Perhaps I'll try to make cupcakes with the taste of Twix bars next.... Who can say no to a Twix bar? Probably no one. Who can say no to a Twix cupcake? To be determined.
(P.S. The Iana - Oven saga continues to unfold, although I claim this as a major step in the right direction, considering the awesomeness of the cupcakes.)
Burnt Offerings
So I thought it would be almost impossible to mess up a recipe, but alas, was I wrong. Turns out, when you don't know your oven well enough, it doesn't go over too well. I was baking my plain chocolate chip cookies about two weeks ago, even setting a timer -- something I never do -- just to realize I am not invincible in the kitchen. I always knew in the back of my mind that one day I would make a big mess in the kitchen; I just never knew when that time would come. Well, now that I've made my first mistake, the next couple will go by easier.
The whole adventure started innocently enough... I wanted to make almond orange coconut chocolate chip cookies. But instead of having my conventional kitchen events go as planned, I realized along the way how completely unprepared I was. Being in a new apartment, I did not have oven mitts or cooking spray. I didn't have a cutting board, and I definitely did not have a Iana-friendly oven. Within 8 minutes, smoke started coming out through the stove tops and about two minutes later, the fire alarm started blaring. I had never understood how people said things like "I make the fire alarm go off when I cook... don't trust me in the kitchen." But I had now become one of those people. I had never made a fire alarm go off. I had no idea how to make it stop... I had heard urban tales of home remedies for stopping the fire alarms -- stories ranging from covering the fire alarm with a wet towel to waving a pillow in front of it. Well all these people with their solutions must have obviously had a much more furnished apartment than mine, because not having a couch or chairs will definitely be a disadvantage when trying to stop the loud, embarrassing noise. I just opened all my windows and doors and hoped my neighbors would take my noise-making as a premonition of the volumes at which I would play the Tyra Banks shows from that night on every day when I got home.
I did not get a picture of these burnt cookies, although I meant to. Only one friend saw them and actually dared to have one. He didn't rave about them, but he didn't complain either. They were rather edible... I just have really high standards for cookies. But I still think it was the oven's fault, and not mine. Because let's be honest... have I ever made such a major mistake in the kitchen before that I turned up a half a batch of burnt cookies? No. Has this oven of mine turned up a half a batch of burnt cookies? You bet your bottom dollar it has! This Iana-Oven saga will continue... And you can be sure I'll show it who's boss!
Thursday, March 11, 2010
Restaurant Reviews: The Palm and The Thai Restaurant
As much as I love to cook, I love to eat out too and get ideas for myself. And in this past month, before I had my full-sized kitchen in my apartment, I ate out quite a bit. The restaurants I will review today feature a variety of cuisines -- both Italian and Thai.
The Palm

The food was delicious, this is true. The prices were slightly higher than I would usually pay for a regular dinner. However, if you want to go to a nice restaurant with a date, or with several friends, and don't mind paying upwards of $40 for a 9 oz. filet mignon, then this is the place for you!
The ambiance was lovely (although it was a little bit hot in our part of the restaurant), our waiters were very attentive, and the food was great. And if you go here, the house specialties are lobster and filet mignon, so at least I got one of their best meals!
Here is the food I had with a rating between 1 and 10, with 10 being the max:
- mashed potatoes (8.0)
- potatoes au gratin (8.4)
- filet mignon (8.8)
- mushrooms (9.6)
- chocolate cake (9.3)
- creme brulee (9.8)
- cheesecake (8.2)
By far, hands down, best creme brulee I have ever tasted. It has inspired me to go make my own!
The Thai Restaurant
Although the name of the restaurant lacks in creativity, I did not expect the food to also be bland. Maybe I chose the wrong thing on the menu (although can you really go wrong by ordering chicken dishes?), but I was not too impressed with my first Thai experience. I don't think I'll give up on eating Thai just yet, but I will obviously need more suggestions on what dishes to choose. Or perhaps I'll convince people to go try different Thai restaurants around town... Yes?
Anyhow, my meal was under ten dollars (before tax), but I feel that it was overpriced based on quality and taste. In fact, I feel as though all they gave me was plain rice, steamed broccoli and chicken. Why would I pay that much again for something I could prepare for half the price, you know?
Where shall I go next in my take-out adventures? ... stay tuned to find out!
The Palm
The food was delicious, this is true. The prices were slightly higher than I would usually pay for a regular dinner. However, if you want to go to a nice restaurant with a date, or with several friends, and don't mind paying upwards of $40 for a 9 oz. filet mignon, then this is the place for you!
The ambiance was lovely (although it was a little bit hot in our part of the restaurant), our waiters were very attentive, and the food was great. And if you go here, the house specialties are lobster and filet mignon, so at least I got one of their best meals!
Here is the food I had with a rating between 1 and 10, with 10 being the max:
- mashed potatoes (8.0)
- potatoes au gratin (8.4)
- filet mignon (8.8)
- mushrooms (9.6)
- chocolate cake (9.3)
- creme brulee (9.8)
- cheesecake (8.2)
By far, hands down, best creme brulee I have ever tasted. It has inspired me to go make my own!
The Thai Restaurant
Although the name of the restaurant lacks in creativity, I did not expect the food to also be bland. Maybe I chose the wrong thing on the menu (although can you really go wrong by ordering chicken dishes?), but I was not too impressed with my first Thai experience. I don't think I'll give up on eating Thai just yet, but I will obviously need more suggestions on what dishes to choose. Or perhaps I'll convince people to go try different Thai restaurants around town... Yes?
Anyhow, my meal was under ten dollars (before tax), but I feel that it was overpriced based on quality and taste. In fact, I feel as though all they gave me was plain rice, steamed broccoli and chicken. Why would I pay that much again for something I could prepare for half the price, you know?
Where shall I go next in my take-out adventures? ... stay tuned to find out!
Wednesday, March 10, 2010
Workin' my 9-5... and a little bit of Quiche!
I know I promised a blog by the end of last week, and we're already half-way through this one but my job has literally taken over my life. I wake up at 7ish and come back LATE late. Meaning Monday I left work at 9 pm, Tuesday I left at 9:30 pm, and today it was 10:50 pm. Why so late??

But anyhow, I made a quiche last week and it was delish! So at work, it was my turn to bring breakfast on Thursday morning, so I woke up extra early, went grocery shopping and here is the result!
So to make it...
I mixed fresh spinach with sour cream and put it at the bottom of the pie dish. I then fried some bacon, and after it cooled down, I crumpled it and put it aside. At the same time, I sauteed some onions and oven roasted golden classic chicken (from the deli, sliced on 10, diced). I mixed in the bacon and put the mixture on top of the spinach. Next, I put lots and lots of parmesan and mixed cheddar/American cheese on top. I beat some eggs, mixed them with half and half and poured that on top of the pie dish and put it in the oven. And voila! It really wasn't hard, but the preparation took longer than expected.
Sorry for the short blog post, but I have to go sleep now... seeing as how I have to be back at work in less than 8 hours.
Until next time, wish me luck bartering to get my living room furniture for cheaper than listed on craigslist! :)
Tuesday, March 2, 2010
It's Been a Long, Long Time...
So I've been on hiatus for the last three weeks, mostly because my life has quasi turned upside down since my last entry. In a good way, though, no worries!
Drumroll please....
I now work for The Man! I started working in Corporate America three weeks ago and so far... it's not that bad. :)
But now that I'm in a new city and have started my grown-up life, I had to go around and get all settled in. Between my 6-hour, 12-apartment complex, 29-floor plan apartment hunt and three-week legal paperwork wait for my car titles, I've found that there's a lot to consider and do when starting over. Advice for the future: get a ThankYou Rewards credit card before you go around buying expensive mattresses and furniture and stuff left and right. It will help and it's like free money! (Yes, I know there's no such thing as a free lunch...) Anyways, I just now discovered that there's an AT&T Universal Card that would get me 10% off all my AT&T purchases for the first year, and 5% after that... so it seems like a good deal... right? :) I mean considering I just signed up for cable, internet and a phone plan all through AT&T.
So, on to the more important things: Fish Tacos!
I know I promised in my last post (forever and a half ago) that I would talk about Fish Tacos and the time has come! I forget everything I was going to originally tell you guys about the tacos, but I DO remember that my whole family loved them and they were really healthy! But I did remember to take pictures... :)

Just in case the picture doesn't come out perfectly clear or anything, the plates in the picture above are like this (clockwise starting top right):
1) Lettuce
2) Sauteed onions
3) Sauteed red bell peppers and avocado
4) Grilled salmon
5) Tortillas!
It wasn't too difficult to make. The only thing I had a little bit of trouble with was grilling the salmon (which was marinated in this yummy sauce I made with lemons and garlic and pepper and I forget what else), but I only had issues with it because I've never before grilled fish in my life. But overall, I would say the fish tacos were a success.
Random question of the day: should I get a Starbucks Reward Card? I tried signing up for one a few days ago and for some reason Starbucks' website didn't recognize my card as valid so I took it as a sign to reconsider my sign-up.
Anyhow, this blog hardly seemed organized and for that I apologize. I actually had a very nice blog typed up yesterday and then I walked away from my computer and I guess it had one of those automatic updates that it does every two weeks and it restarted... without saving my work. Oh well... Look forward to a blog about quiche by the end of the week!
Sunday, February 7, 2010
Love is in the Air
... or at least it's in my cookies.
Since today is officially the beginning of Valentine's Day Week (I just made that up, so don't try to verify it anywhere online), I thought I should start making themed cookies. Of course, chocolate had to be an ingredient (not only because of it's fabulous taste, but also because it's pretty much tied in to Valentine's Day -- at least as advertised by Hallmark). They weren't exceptionally hard to make, but the decorating took a little longer than expected.
The actual cookies are coconut shortbread cookies, covered in chocolate ganache (which, due to my frequent use of it, I'll give y'all the recipe for it in a little bit), and decorated with pink chocolate. I've had two so far (because otherwise all my cookies wouldn't have fit nicely on the tray), and I thought they were delicious. We'll see the reviews the cookies get at school when I take them up there.
My advice for y'all: if you haven't baked before, or you're not overly confident in the kitchen but still want to start baking more, take baby steps. You could, for example, buy ready-made cookies and then cover them yourself in chocolate ganache. Or, so the final product isn't too sweet, you could just buy English tea biscuits and cover them in ganache and proceed. When I first started making cupcakes, I often just used cake mix and then, slowly, as I got more confident, I started actually making everything from scratch. Now, I've moved on to not even following recipes all the time, but making my own up. Remember, a journey of a thousand miles begins with a single step.
So here is the result of today's culinary adventure:

As you can see, I had a little bit of trouble with the decorating and not all my designs look perfect. But it's the imperfections that make these cookies so special. After all, Valentine's Day is based on being able to look past the imperfections, right?
Anyhow, here is the chocolate ganache recipe I promised:
3/4 cup semisweet chocolate chips
3/4 cup milk chocolate chips
1/3 cup whipping cream
Heat up the whipping cream until it's boiling, then pour it on top of the chocolate chips. Stir. It will go from looking like poorly mixed chocolate milk to a nice creamy, chocolate-y goodness. Just keep stirring until it's homogeneous in texture. It is delicious. Also, try to use it as quickly as possible, so it doesn't harden in the bowl instead of on top of your cookies. You can store it in the fridge, too, if you have leftovers.
Good luck in your baking adventures, everyone.
Next time... Fish Tacos!
Thursday, February 4, 2010
Hey there, Puddin'
In keeping with my own advice from the last post, I went into my kitchen willing to try something I had never tasted before, something I had never heard of before, something I thought was a completely original dessert: blueberry mocha pudding.
Technically, berries taste good with chocolate. Chocolate tastes good with coffee. So, shouldn't berries taste good with chocolate and coffee? The suspense of that answer was motivation enough for me to venture to attempt the combination.
After doing a quick inventory of what I had in the kitchen, I chose blueberries (the only kind of berry we had, albeit frozen, not fresh). Luckily, we had cappuccino mix and my parents didn't finish their pot of coffee from the morning, making it an obvious invitation for me to use the leftover coffee.
Since I did not want to experiment with the texture of pudding, I thought it would be best to not put in whole blueberries. But since the berries were frozen, all I had to do to get a lot of their juices out was just thaw them. Of course, with my patience being unusually short when it comes to trying a new dessert, I put them directly in the microwave and it worked just the same. After squeezing and pressing all the juice out of them, I was ready.
I made regular vanilla pudding and regular chocolate pudding. Except the chocolate pudding wasn't completely "regular" per se. Instead of using just milk, as the recipe asked, I substituted some of the cappuccino and coffee to bring out the flavor. The result: mocha pudding! Upon initial tasting, the coffee taste was overpowering, but when mixed with the overly sweet vanilla pudding, they complemented each other perfectly!
After mixing the two puddings, my sister artistically poured the blueberry juice on top and voila: blueberry mocha puddin' for all! And it tasted fantastic, too. ;)

P.S. Stay tuned for more sweets soon, since the chemical engineering kids have requested some tasty treats from me this weekend!
Sunday, January 31, 2010
Quesadillas and Merlot
Although I've lived in Texas for the last 11.5 years, I have never made a Mexican dish. I've eaten it plenty of times, but I've not ventured into the kitchen once with the intent of making my own Mexican concoction. And so, on my trip to visit Sweta, I thought: "why not try it now?"
And so, our adventure began. First, we had to choose what exactly we wanted to make. Not wanting to try something too intricate, we decided to stick with quesadillas. Yes, they're usually served as an appetizer in restaurants, and no, they're not very hard to make... or so one would think. Turns out, our quesadilla dinner turned into a supper by the time we got all the ingredients and mastered the art of making them (successfully).
Not wanting to make quesadillas that were completely uninspired in terms of ingredients, we decided to include all the healthy goodness we could. So our shopping list included:
And here are the pictures...
Here is the very first quesadilla. Notice the charcoal appearance. Sweta said it was delicious, though.

And then, by the time we made the fourth one, there was great improvement, as the picture shows! Huge learning curve, if I may say so myself... Biggest lesson of the night: Don't be afraid to try something new.

- tortillas
- cheese (note to anyone else who didn't know: you can ask to sample cheeses at the deli counter; also, through my many years of making friends with deli workers, my advice is to get your meats sliced on 1 for sandwiches and 2 for cheeses; and although not all deli places advertise the cutting sizes for their meats and cheeses like HEB does, the sizes I gave you are pretty universal)
- oven roasted chicken breast (sliced on 7 -- perfect size for grilling and putting into salads.. and quesadillas, too)
- corn
- red bell pepper
- green bell pepper
- onion
- spinach
- avocado (which we forgot to add in by the end... oops)
- pineapple (as a healthy dessert... or in our case, healthy brunch the next day)
- If you don't put oil or Pam in a pan before throwing a tortilla on there, it will blacken and smoke will come from the kitchen area.
- You need to turn the tortilla over on both sides while making quesadillas to ensure excellent taste.
- Sometimes the tortillas will rise up. I haven't figured out why this happens, but we stabbed the air bubbles that formed with a knife.
- Cheese is a the main ingredient in quesadillas. Make sure you add plenty, especially if you want to actually close the quesadillas on the edges.
- Drinking Merlot while making quesadillas will make all of the above lessons much more fun.

And then, by the time we made the fourth one, there was great improvement, as the picture shows! Huge learning curve, if I may say so myself... Biggest lesson of the night: Don't be afraid to try something new.

Wednesday, January 20, 2010
Can't stop thinking about it...
I've come to the realization that I am obsessed with baking. It's not even a secret any more. The slightly overwhelming part of this is that my brain is almost always thinking of something new to bake. Someone will be talking to me, and if I get slightly bored or uninterested and my brain starts wandering, it inevitably ends up with a new concoction in the kitchen. I was especially productive in making mental lists of things I wanted to try in my long drives to Houston. There's raspberry chocolate pudding, apple banana vanilla pudding, mocha coffee bean pudding, double chocolate chunk strawberry cookies... The possibilities are endless!
And then... I've also become fascinated with shakes. I did this program where I entered in what I eat every day to see what I need to cut back on. Not surprisingly, the one part of my daily intake that I fulfilled (and quite often surpassed) first every day was my sugar intake. Apparently, I'm only allowed to eat 24 grams of sugar daily. So I've become overly careful to look at the labels before I eat. And here's the fun fact of the day (that relates to milkshakes): unless you buy unsweetened soy milk, you're usually taking in as much as 12 grams of sugar per glass of milk. But, using yogurt instead of milk saves you up to 6 grams per cup.
So my first milkshake experiment was a vegetable one: cucumber, dill, and yogurt. Sounds slightly weird, but it's quite healthy! And tasty, too!

Wednesday, January 13, 2010
Marbled Pound Cake Success(es)
So after diligently searching for a job for the last five days and applying to an average of three companies a day, each with its own cover letter and resume edits, I decided it was time for a mental break. You wouldn't believe how hard it is to continuously find new companies that are willing to hire someone with almost no experience...

Hopefully my mom will actually like my baking this time, so I won't be stuck with three individual pound cakes and no one to eat them (my diet will probably sacrifice two days of food for me to be able to eat one).
Personally, I had no issue with the Taco Bell Drive Through Diet and thought it was perhaps a small step toward making more people aware of the health information for their fast food purchases. I will say, though, that I don't think The Big Mac Snack Wrap is a step in the right way in any way, shape, or form. Maybe they're trying to appeal to an ever-increasing Hispanic population, but introducing items like this may not be the best way possible... In my opinion, at least.
And what better way to clear my mind than by baking? Anyhow, I tackled the first of my three culinary ideas and made some marbled pound cake. In three individual pans. So they're a little small, but it only makes the serving sizes smaller (and by default, healthier!) The actual baking took longer than I thought... almost an hour! But I'm waiting for them to cool right now, so I'll let y'all know how they turn out. Don't worry... I took pictures.

Hopefully my mom will actually like my baking this time, so I won't be stuck with three individual pound cakes and no one to eat them (my diet will probably sacrifice two days of food for me to be able to eat one).
On a grosser note, McDonald's has announced the addition of an item to it's menu: The Mac Wrap.
Personally, I had no issue with the Taco Bell Drive Through Diet and thought it was perhaps a small step toward making more people aware of the health information for their fast food purchases. I will say, though, that I don't think The Big Mac Snack Wrap is a step in the right way in any way, shape, or form. Maybe they're trying to appeal to an ever-increasing Hispanic population, but introducing items like this may not be the best way possible... In my opinion, at least.
Anyhow, hope y'all have a great day and happy baking!
Tuesday, January 12, 2010
New Ideas Galore!
Okay, so they're not new ideas "galore," per se. But since I have been without my own kitchen for five days now, I did not waste precious time. Instead of baking, I thought of future projects. And, not to brag or anything, but I've come up with some fairly phenomenal ideas, if I may say so myself. Here they are:
1. Marbled Pound Cake -- I had some at Starbucks three days ago and now I want to have some in my house, all the time
2. Cappuccino Crème brûlée -- made in individual cappuccino cups
3. Chocolate Covered Love Stamp Cookies
Now, you may be thinking to yourself: "What are these chocolate covered love stamp cookies you speak of, Iana?" Well, here's the idea:
I would probably take some chocolate chip cookie dough, cut it in squares, and bake it. Then, after taking it out of the oven and letting them cool, I would cover them in chocolate ganache and right as the ganache starts hardening, I would stamp a heart or a love something or other on top. This way, it would look like a Valentine's Day postage stamp (you know the ones they come out with every year around February and that a lot of people use on engagement and wedding invitations)... but it would be bigger and made with chocolate! Of course, I probably won't make this one till it's closer to Valentine's Day so as to not spoil the surprise. That and I haven't quite figured out how I could stamp a stamp design into the chocolate ganache. So if anyone has any ideas, please let me know!
Friday, January 8, 2010
The Beginning of a Great Adventure
As would be expected, I started this blog at the worst possible time: when I’m on a new diet. As such, my culinary adventures will be highly restricted to what I’m allowing myself to eat. But this will only make this blog more perfect. I somehow foresee that this blog will revolve highly around baking sweets as soon as I get off this diet, and now we can at least pretend my blog isn’t all about being unhealthy. In fact, I really think the first few weeks will be mostly salads, with an occasional adventure with pasta or rice.
Naturally, I’m also not going to be cooking anything spectacular for a couple more days, since I’m traveling for a little bit right now. I’ve come down to Houston until Tuesday and, since I’m not at home, it’s harder to take over someone’s kitchen and just let my imagination run wild.
But, since I did not want to disappoint any of my first group of readers by not having anything food related in this first blog, I will post a picture of my last salad (which I made two days ago).
Although it’s usually important to make all your food taste as good as possible, you are always limited by your ingredients (especially when on a diet). This is when appearance jumps to the forefront and you must focus on making it look as good as possible. This is probably the most important lesson when it comes to cooking and baking: if at all in your power, never sacrifice presentation and appearance.

Grilled Chicken Salad Variation 1
Ingredients: Lettuce, grilled chicken breast, corn, black beans, spinach, tomato, avocado, orange bell peppers, olives and feta cheese
Until next time...
Subscribe to:
Posts (Atom)